Beginner's Guide
This guide explains how to get started with Plover. Plover is free stenography software. All the learning resources listed below are free-of-charge.
In order to get started, the main steps are:
- Install Plover (the application)
- Acquire and connect a keyboard or steno writer
- Learn stenography, starting with theory
Download and Install Plover
Plover is an app that translates the strokes you press on your steno machine to entire words. If you do not have a steno machine, Plover can use your regular keyboard as one. It is free to download, and it works on Windows, Mac, and Linux.
- Download and install Plover with the Installation Guide
- If you get stuck, see the troubleshooting guide.
Connect a compatible keyboard or stenography machine
Steno involves pressing down groups of keys (called “strokes” or “chords") all at once. Standard QWERTY keyboards can usually only recognize up to six simultaneous key presses, while a dedicated steno writer has no limit to how many simultaneous key presses it can register.
Among other hardware, Plover is compatible with:
- Standard keyboards - Requires no additional investment from the average computer user. It is possible to overcome the six simultaneous key presses limitation using arpeggiation. Recommended for those who are unsure whether you want to learn steno. Read the page on using a standard keyboard with Plover.
- Hobbyist writers - Pre-built mechanical keyboards specialized for stenography which cost, on average, around $110 USD. Choose from the currently available commercially available hobbyist writers or DIY your own keyboard.
- Professional writers - Used by professional stenographers and court reporters, not typically used by the hobbyist community due to their $1000 (used) to $6000 (new) price tags. If you already own one, you can connect it to Plover as long as it uses one of the supported protocols.
With the help of a plugin, it is also possible to use a video game controller with Plover.
Initially, Plover is set up to use your computer’s typing keyboard by default. If you are using a regular keyboard, proceed to Enable Plover below. Otherwise, if you have a dedicated steno writer, see the page on setting up your writer with Plover to connect your hardware to the Plover software.
Confirm it’s working
Enable Plover
Once your steno writer is connected with Plover,
- Run Plover.
- In the main window of Plover, set
OutputtoEnabled
Write “Hello World”
To confirm Plover is working correctly, you may try to write “Hello, world.” into a text editor with Plover. Open a text editor and write the steno key strokes in the table below, one row at a time.
Notepad in Windows 11 is buggy with Plover's fast emulated output. Try a different program such as Microsoft Word or Google Docs in a browser, or increase the key press delay shown below:
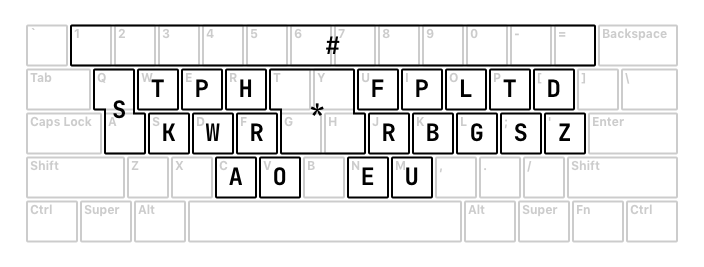
On a QWERTY keyboard, the steno keys are arranged on the layout as follows:

If you are using a QWERTY keyboard, you may find it helpful to follow the column on the right. Unless you are arpeggiating (rolling) your strokes, make sure to press every single key all at once. Remember to release every key after each stroke.
| Output | Steno Stroke | QWERTY Keys |
|---|---|---|
| hell | HEL
|
r (left index index) n (right thumb) o (right ring finger )
|
| o | HRO
|
rf (left index finger pressing in between) v (left thumb)
|
| , | -RBGS
|
j (right index finger) k (right middle finger) l (right ring finger) ; (right pinkie finger)
|
| world | WORLD
|
d (left middle finger) v (left thumb) j (right index finger) o (right ring finger) [ (right pinkie finger)
|
| . | -FPLT
|
u (right index finger) i (right middle finger) o (right ring finger) p (right pinkie finger)
|
If you see different output, open the paper tape (in Plover’s main window under Tools → Paper Tape) and try the steno strokes again. Verify that the right keys are being registered. If the steno keys shown in the paper tape are not the same as those in the middle column above, first make sure you are pressing the right physical keys. If you are still not getting the right output, have a look at the following:
- If you are using a steno machine and are not getting the right keys/output, make sure you have set it up correctly.
- If you are using a QWERTY keyboard and are not getting the right keys/output, your keyboard may not have NKRO. Try rolling or arpeggiating your strokes.
Read about the proper posture and finger placement for stenography.
Practice and learn
- See also: Learning stenography
Now that you have a working setup, you can start learning stenography. The best place to start is memorizing the key layout, and choosing a steno theory. This is the set of rules you need to know in order to convert words to steno strokes. There are a few freely available steno theories each with pros and cons, but the steno community's current recommendation for beginners is Lapwing theory.
Personalize your dictionary
- See also: Personalizing your dictionary
Once you have learned a decent amount of theory, it is important to customize your steno dictionary. English steno uses dictionaries to translate the keys pressed on a steno machine to the outputted text. These dictionaries are essentially huge files that contain entries for most of the words in the English language and their respective steno strokes. Steno is highly personal, and it is difficult to gain speed by sticking to default mappings. No two stenographers' dictionaries are the same because of how complicated the English language is. Some steno concepts work well for some people, but not for others.

