
Setting up a hobbyist writer with Plover: Difference between revisions
(Created page with "== Background == Hobbyist machines use serial protocols to talk to Plover. This means you can have a regular keyboard plugged in for normal typing, and a steno machine plugged in at the same time. Plover will only capture the steno machine input. By default, all hobbyist steno keyboards use a protocol called Gemini PR. Setting it up with Plover is a little involved, especially for the first time. == Video summary == The following narrated video goes over the main method...") |
(add note on serial port permissions on Linux) |
||
| (4 intermediate revisions by the same user not shown) | |||
| Line 1: | Line 1: | ||
Hobbyist machines use serial protocols to talk to Plover. This means you can have a regular keyboard plugged in for normal typing, and a steno machine plugged in at the same time. Plover will only capture the steno machine input. By default, all hobbyist steno keyboards use a protocol called Gemini PR. Setting it up with Plover is a little involved, especially for the first time. | Hobbyist machines use serial protocols to talk to Plover. This means you can have a regular keyboard plugged in for normal typing, and a steno machine plugged in at the same time. Plover will only capture the steno machine input. By default, all hobbyist steno keyboards use a protocol called Gemini PR. Setting it up with Plover is a little involved, especially for the first time. | ||
For Linux users, ensure that you have [[Installation Guide#Allow Access to Serial Ports|access to serial ports]]. | |||
== Video summary == | == Video summary == | ||
| Line 37: | Line 38: | ||
== Serial protocol limitations == | == Serial protocol limitations == | ||
=== Function of the refresh button === | |||
Pressing the <code>Refresh</code>/<code>Scan</code> button merely makes Plover search for new devices—it does not necessarily select the correct device. This is why the process of connecting a writer to Plover is a little tricky. He | |||
=== Connected/disconnected indicator === | |||
Plover will report that it is "connected" to a device, but this may not necessarily be the correct one. If Plover is not receiving the key presses on a keyboard (despite saying "connected"), this means that the selected port is wrong. Go back to <code>Configure → Machine</code> and try a different port in the drop down menu. | |||
=== Resuming from sleep/disconnect === | |||
If you sleep and wake up your computer, or you unplug and replug your machine, your steno keyboard will disconnect. You can try pressing the <code>Reconnect Machine</code> button. | If you sleep and wake up your computer, or you unplug and replug your machine, your steno keyboard will disconnect. You can try pressing the <code>Reconnect Machine</code> button. | ||
[[File:Plover main window with reconnect machine button highlighted.png|alt=Plover main window with reconnect machine button highlighted|center|frame|Reconnect machine button.]] | [[File:Plover main window with reconnect machine button highlighted.png|alt=Plover main window with reconnect machine button highlighted|center|frame|Reconnect machine button.]] | ||
If that does not work, it is likely that the serial port has changed and you will have to redo the above steps again. | If that does not work, it is likely that the serial port has changed and you will have to redo the above steps again. | ||
=== | ==== Auto reconnect ==== | ||
On some computers (particularly Linux and macOS), the serial port will generally not change when the steno machine is unplugged and plugged back in. If this is the case, you can set up autoreconnect with | On some computers (particularly Linux and macOS), the serial port will generally not change when the steno machine is unplugged and plugged back in. If this is the case, you can set up autoreconnect with a plugin. See the wiki page on [[auto reconnect]]. | ||
Latest revision as of 21:59, 26 June 2024
Hobbyist machines use serial protocols to talk to Plover. This means you can have a regular keyboard plugged in for normal typing, and a steno machine plugged in at the same time. Plover will only capture the steno machine input. By default, all hobbyist steno keyboards use a protocol called Gemini PR. Setting it up with Plover is a little involved, especially for the first time.
For Linux users, ensure that you have access to serial ports.
Video summary
The following narrated video goes over the main method and trial and error method described below:
Main method
This method involves determining the serial port for Plover to listen to.
- In Plover's main window, go to
Configure → Machineand change the machine to Gemini PR. - With your machine unplugged, press the
ScanorRefreshbutton.- Take note of the options that are listed in the Port drop down menu.
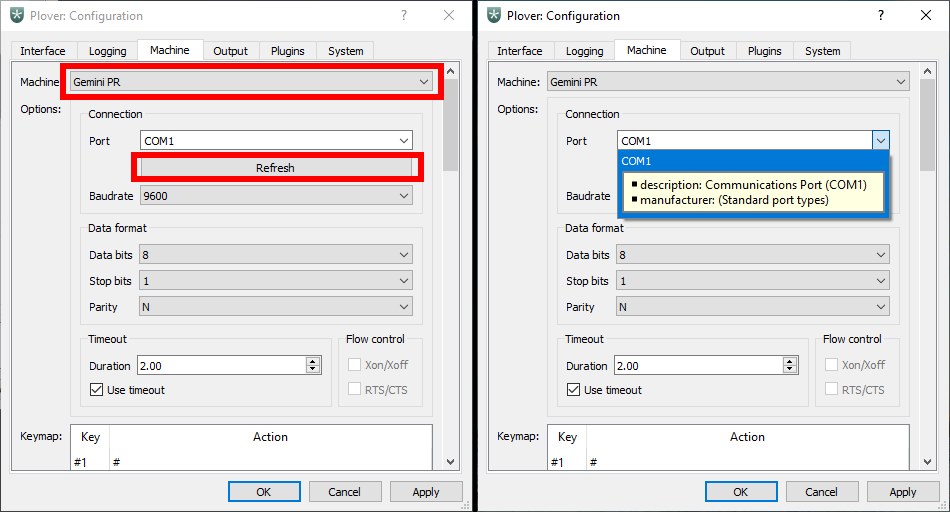
Steps 1 and 2.
- Take note of the options that are listed in the Port drop down menu.
- Plug in your machine.
- Press the
ScanorRefreshbutton. - Open the
Portdrop down menu.- If you see your device name show up, select it.
- If you only see generic names, select the option that was not present in step 2.
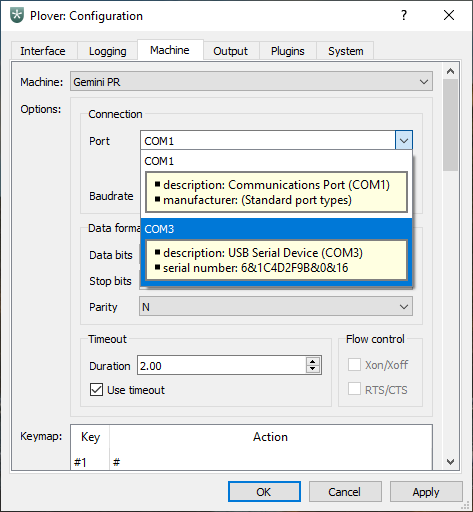
COM3 wasn't present earlier, so it is the steno machine that was just plugged in.
- Press
ApplyandOK - Test that your machine is working
- Open the paper tape (
Tools → Paper tape) - Press some keys on your machine
- Verify that they show up in the paper tape
- Open the paper tape (


Trial and error method
Alternatively, after pressing the Scan or Refresh button with your machine plugged in, you can simply try each option in the Port drop down menu. This is useful if there are only a few options to try.
- In Plover, open
Configure → Machineand change the machine to Gemini PR. - Plug in your machine.
- Press the
ScanorRefreshbutton. - Select the first option in the
Portdrop down menu. - Press
ApplyandOK - Open the paper tape and press some keys on your machine.
- If you see output in the paper tape, you are done.
- If nothing shows up, repeat steps 4 and 5, but with a different option selected in the
Portdrop down menu.
Serial protocol limitations
Function of the refresh button
Pressing the Refresh/Scan button merely makes Plover search for new devices—it does not necessarily select the correct device. This is why the process of connecting a writer to Plover is a little tricky. He
Connected/disconnected indicator
Plover will report that it is "connected" to a device, but this may not necessarily be the correct one. If Plover is not receiving the key presses on a keyboard (despite saying "connected"), this means that the selected port is wrong. Go back to Configure → Machine and try a different port in the drop down menu.
Resuming from sleep/disconnect
If you sleep and wake up your computer, or you unplug and replug your machine, your steno keyboard will disconnect. You can try pressing the Reconnect Machine button.

If that does not work, it is likely that the serial port has changed and you will have to redo the above steps again.
Auto reconnect
On some computers (particularly Linux and macOS), the serial port will generally not change when the steno machine is unplugged and plugged back in. If this is the case, you can set up autoreconnect with a plugin. See the wiki page on auto reconnect.