Auto reconnect: Difference between revisions
m (Aerick moved page Autoreconnect to Auto reconnect without leaving a redirect) |
|||
| Line 17: | Line 17: | ||
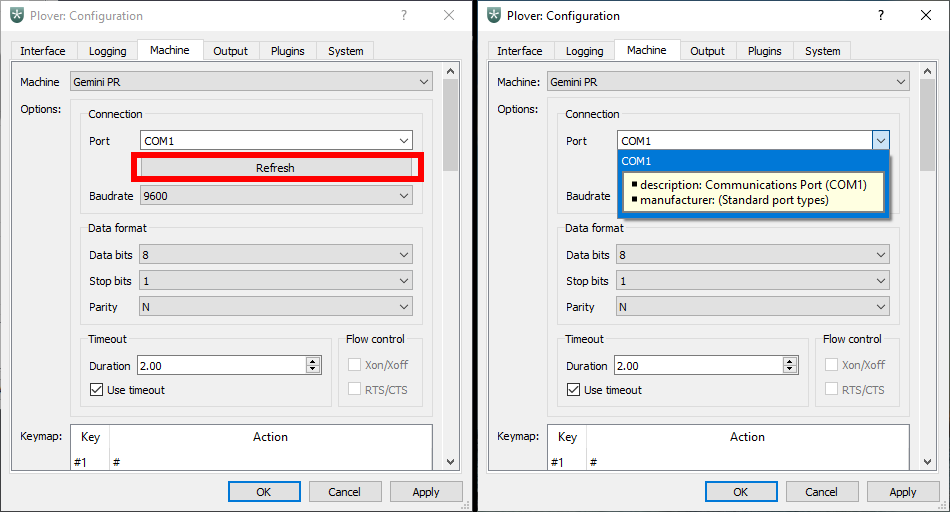
[[File:Auto-reconnect-test.png|alt=Plover configuration machine tab with refresh button highlighted. Drop down menu options highlighted.|center|thumb|708x708px|Left: <code>Refresh</code>/<code>Scan</code> button. Right: drop down menu options.]] | [[File:Auto-reconnect-test.png|alt=Plover configuration machine tab with refresh button highlighted. Drop down menu options highlighted.|center|thumb|708x708px|Left: <code>Refresh</code>/<code>Scan</code> button. Right: drop down menu options.]] | ||
== | == Plugin installation == | ||
# Open the plugins manager. | # Open the plugins manager. | ||
| Line 27: | Line 27: | ||
For more detailed steps for installation, see the [[Plugins#How to Install Plugins|plugins page]]. | For more detailed steps for installation, see the [[Plugins#How to Install Plugins|plugins page]]. | ||
== | == Plugin setup == | ||
# In Plover's main window, go to <code>Configure → Plugins</code>. | # In Plover's main window, go to <code>Configure → Plugins</code>. | ||
Revision as of 18:18, 23 June 2024
Background
For steno writers that use serial protocols such as Gemini PR or TX Bolt, Plover requires the user to manually press the reconnect machine button if the writer is unplugged and replugged. The plover-auto-reconnect-machine plugin can handle this automatically. However, if the serial port changes between plugs, please note that this plugin will not work.
This can be checked by going to Configure → Machine and follow the instructions below:
- Open the
Portdrop down menu. - Take note of the serial port that your machine is using.
- Unplug your writer.
- Press the
Refreshbutton (labeled asScanon older versions of Plover). - Plug in your writer.
- Press the
Refreshbutton (labeled asScanon older versions of Plover). - Open the
Portdrop down menu. - Check if the new serial port is the same.
- If they are the same, you can proceed with this page to set up auto reconnect.
- If they are different, auto reconnect may not work.

Refresh/Scan button. Right: drop down menu options.Plugin installation
- Open the plugins manager.
- Find
plover-auto-reconnect-machinein the list. - Press
Install/Update - Proceed with the installation.
- Press
Restartafter it is finished.
For more detailed steps for installation, see the plugins page.
Plugin setup
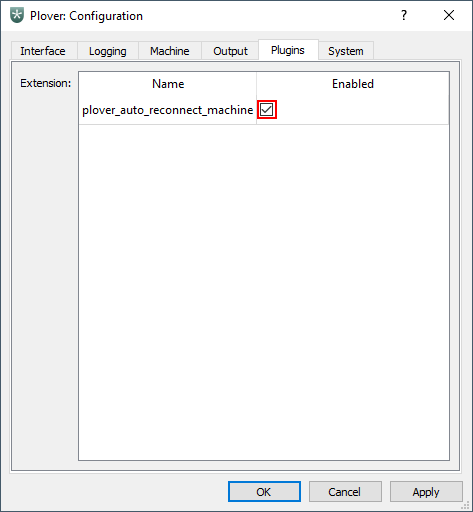
- In Plover's main window, go to
Configure → Plugins. - Check the box next to
plover-auto-reconnect-machine. - Press
Applyand thenOK.

plover-auto-reconnect-machine plugin.